Outdoor Faucet Winterization

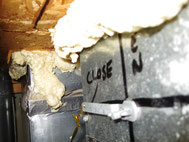
1-Interior Water Shut-Off Valves
Close both valves by turning the handles clockwise to the right. Then open the small screw protruding from the left of each handle to allow water to drain from the valve. A tiny bit of
water will drip from this screw, so use something to absorb it.
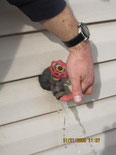
2-Evacuating Water from Line
At the outside faucet, turn handle counterclockwise to open the valve. Pull up gently on the small black piece protruding from the center of the faucet. This will allow all the water
to drain from the line. Water may or may not drain out. Close valve after water is drained.
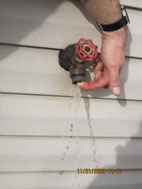
3-Evacuating Water from Line
Another view of holding the black piece up to drain water from line. The tip of the black piece is visible on our demonstrator's forefinger. After water is drained, leave the valve open slightly
after water is drained.

4-Faucet Protector Top View
To protect pipes from freezing, install a faucet cover. This one is from Home Depot.

5-Faucet Protector Inside View
Place hook over faucet and screw on from the outside.
Water Shutoff Valves

Shutoff valves and knobs for the sprinkler system, main house water, and outside water faucets.
ALWAYS close and winterize your outside faucets. See separate album for proper procedure.
Close the main house valve when you are away to avoid water damage in the event of a pipe break.
These photos show the locations near the hot water heater for the shutoff valves and knobs for the sprinkler system, main house water, and outside water faucets. They are OPEN when vertical in line with the pipes; to CLOSE, rotate the valve 90 degrees to a horizontal position. NEVER close the sprinkler system valve unless it has malfunctioned or is accidentally set off.
Duct Damper Controls for Heat & AC

Damper Control
1st-2nd floor
Damper Control
3rd floor
Damper controls are located on the first floor in the utility closet. Damper levers on duct work control air flow for heating and air conditioning. Using these levers, you can control the flow of air to different floors of your home without changing individual registers. There will be two levers, one for the first and second floors and one for the third floor. Your damper controls will most likely be marked in some way, either Open/Closed or Winter/Summer. If not, you must test them in different positions to determine where the air is flowing when one lever is vertical and the other is horizontal. The levers need to be in opposite positions at all times. In the winter, turn the lever for the 1st and 2nd floor to the Open position (mark it Winter) and the 3rd floor to the Closed position - this will force the greatest amount of warm air to the 1st and 2nd floors and it will rise to the 3rd floor. In the summer, reverse the levers - close the 1st and 2nd floor lever and open the 3rd floor lever. This will force cold air to the 3rd floor, where it will drop to the 2nd and 1st floors. If you use this method to control air flow, keep your registers 1/2 to 3/4 open and leave them alone!
Roof & Gutter Replacement and Trim Upgrades
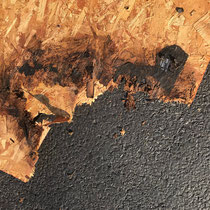
The below photos from River Oaks owner Scott Rayner show his own roof replacement, an upgrade to seamless 6x6 gutter and 3x4 downspouts, vinyl clad trim capping around wood on bay window and upper bump out, hidden vent soffit and all fascia/rake capping. Scott recommends that if gutters are changed, owners should install larger gutters and spouts to control the water and get it away from the house. The rotten OSB plywood (same as under siding) was found in multiple sections under roof during the removal totaling roughly 350 square ft. Inspecting the attic did not show these areas as they are outside of the “warm” wall of the home. There were no leaks or signs of water inside the home which was the alarming and frightening part considering the amount of rot that was found. A lot of the issue with the roofing rot was near the roof edges in/near the gutter line. Under the gutters is a ventilated section of soffit which has a large amount of noticeable rust and staining from the water getting into it from the rotten wood above. The shingles also had nail holes in them from the original siding installation which were left in my guess on most homes in the development as well. From the ground, some roofs are visibly retaining water, cracking on the edges, delaminating, missing shingles and have patchwork. Unfortunately, most people wait to see a leak on their ceiling and I fear that the damage will be significant and potentially could lead to other parts of the home needing service and work based on where the water is able to get into without any visibility, similar to the siding issues. To see a description of each photo, click on the photo to enlarge. For more information, contact Scott Rayner.


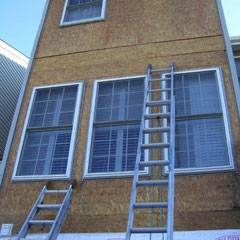
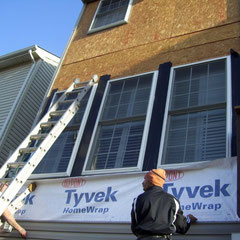
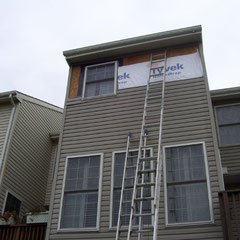
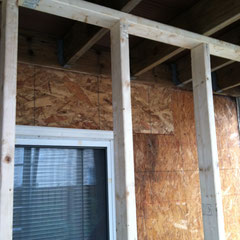
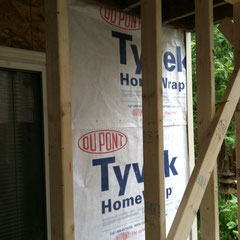
Window Flashing & Tyvek Installed Under Siding
Water was leaking behind the siding and around the windows of this home causing major damage to window frames and hardwood floors. The owner had the siding removed and Tyvek installed to prevent future water penetration and to help protect insulation in the walls.
Note (05/2018) from Scott Rayner, River Oaks resident and contact for POWER REMODELING (listed in Vendors We Like under Siding): Tyvek's main function is water resistance and breathability. Adding this behind the siding does not help with insulating the home and, if not installed very well, can trap water behind the siding and still lead to the same issues.
Tyvek also cannot be installed with insulation on the exterior of the home or up against the plywood. Reason being is the "capillary effect" where water can get trapped between the Tyvek and insulation, compressing it and leading to vapor retention. In the instructions for Tyvek, it states that it is not intended to be used with insulation. Material such as Kingspan GreenGuard RainDrop is a breathable underpayment that can be used with exterior breathable insulation.
Insulation is found in the wall cavities between the studs. This became part of the building code around the early 1980s, so any home after that should have some in the wall cavity and more has been required as the years have gone by. However, depending on the age and how much insulation is present, insulation can settle and become less effective. The most effective way to insulate the walls of the home today without ripping out drywall and spraying more in the cavities is from the exterior behind the siding panels.
This is why the type of house wrap used is important to control breathability and water management behind the siding while adding a benefit of insulating the walls. Any siding no matter how high quality will get water behind it. Where the water goes is what needs to be managed better.
A house wrap that works with a breathable foam back insulated siding would be the best way to insulate the home and prevent water from getting behind the siding by creating support so warping waving and bucking occur less or not at all.


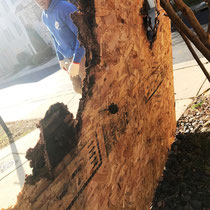
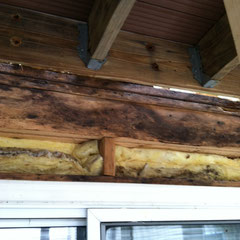
Water Damage Under Siding-Tyvek Installed
Water leaking behind the siding of this home led to mold and rotten wood. The owner and a contractor removed the siding, allowed the Oriented Strand Board (OSB) to dry, cleaned the mold and installed Tyvek to prevent future water penetration.
Additional Information from the owner: According to information on The Family Handyman website, www.familyhandyman.com, the Engineered Wood Association, architects and most builders rate plywood and oriented strand board (OSB) equal in strength and durability. Like-thicknesses of these two products can span the same distances between studs or rafters, weigh about the same and offer similar nail-holding abilities. OSB has its advantages. Some panels have a textured surface, which makes them less slippery when used for roof sheathing. OSB panels often have lines at 16- and 24-in. intervals so you know where underlying studs, rafters and joists are for nailing. In our area, 1/2-in. OSB costs a few dollars less per sheet than 1/2-in. plywood. And OSB is available in 4 x 9-ft. sheets, which means you can sheathe an 8-ft. tall wall and the joists below with a single sheet. OSB has one irritating characteristic-but only if you abuse the stuff. The edges tend to swell when they get wet and remain swollen even after drying out. This results in ridges that can "telegraph" through shingles, and even carpet when OSB is used for subfloors. So store your OSB in a dry place, then cover it with tarpaper or siding ASAP to protect it from the elements.


Tot Lot Upgrades in 2017